Lesson 6 – Take your movie to the next level
Welcome
Hello, and welcome to Lesson 6! So far, we’ve looked at using Nawmal to create characters and dialog; and touched on how to create camera angles that draw you into the action, and how to use camera motion to tell a silent part of your story. You have learned about creating character expressions and gestures, and even how to create dialog. In this lesson, you will learn how to create real interaction between your characters. So far, Carl and Allison have spoken to camera (to the viewer), but they haven’t really had an opportunity to speak and interact with each other.
Today, you will create a third character and turn your “news show” into a “talk show” by adding a new character who will talk with Carl about animation. This may seem like a straight-forward tutorial – and technically speaking, it is. You already know how to create dialog. However, so much of creating a film is more than dialog – in fact, you can change the entire mood and energy in a scene just by changing camera angles.
You know how to write the spoken dialog; today, you’re going to learn how compliment and accentuate that with camera angles.
Open your Project
If you haven’t already, open the project we have been working on. At the end of the last lesson, you should have saved it as Part 1 of our project. We are going to use it to begin Part 2, as it will help us to save time in setting up our characters and cameras.
To save you time, we saved a project file from where we left off at the end of the last lesson for you to download with this lesson – just click here, open that file, and follow along.
Now, delete all of the dialog, by highlighting and deleting the text in a text block, and then pressing the backspace button. Now use the Move button to click and drag Carl over to the seated area. Right-click on Allison, and select Remove Allison – we won’t be using her in this scene.
Note: You will see Marker A left over from the previous scene. You can right-click and click Remove Marker A.
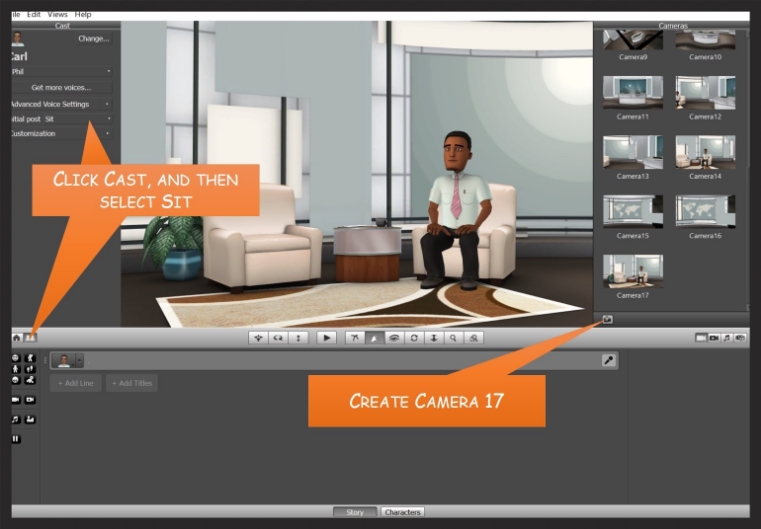
Click Move, and then click and drag Carl so that his heels are right up to the right chair. In this scene, however, he will be seated. The best way to do this is to click Cast on the middle toolbar, then scroll up to Carl. From the Initial Posture picklist, select Sit.
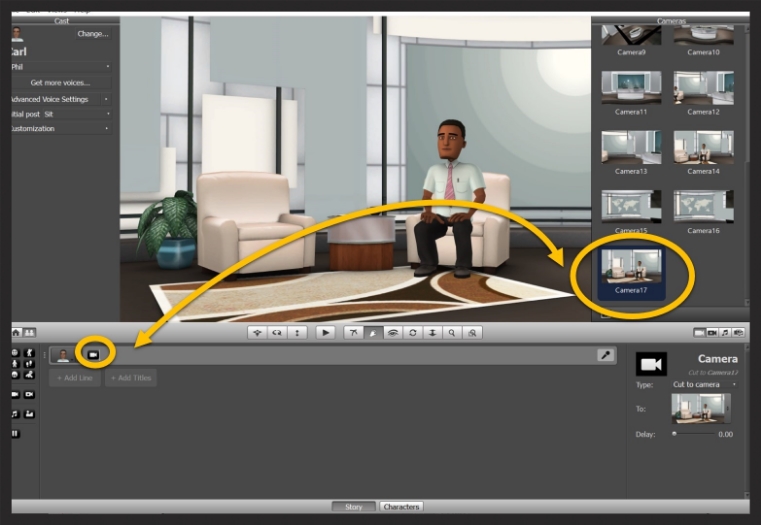
Use the camera movement buttons to move your view so that the two chairs are situated in the middle of the shot. When you’re happy with how that looks, add that as a camera angle. It should be Camera 17.
Begin the Scene
Drag and drop Camera 17 to the beginning of the first line. This will be the opening shot of your new movie.
Create a Second Character
Let’s create a second character for Carl to interview. At the bottom of your screen, click Characters. From the Suits collection install Eve, and drag her to the scene. Remember to look at the blue target circles – position the target to land directly in front of the other chair.

As soon as you add Eve, she will be added to the Cast pane. We can add a voice for her the same way we did Carl and Allison: Click Get more voices, and this time, let’s select a British female voice. Elizabeth is a good choice. After you install the voice, select it in the Voice picklist. In the Initial posture picklist, select Sit.

Now we want the scene to open with both Carl and Eve sitting across from one another in the chairs. But think of the different ways you could do it:
- You could have Carl standing. The scene opens, Carl introduces Eve. Eve walks onto the stage to applause. They both sit.
- Carl and Eve are both standing when the scene opens, they both sit after some introductory remarks.
- Carl could be at the desk when the scene opens. He introduces Eve. Carl and Eve walk toward each other stopping at the chairs. After some welcoming remarks, they both sit.
- The scene could open with both characters sitting, like a typical talk show environment. For this tutorial, we will assume this setting for both characters.
Automatic Settings
You’ll recall in the last scene we turned off the two Automatic settings; both characters were talking, but not to each other. In this scene, though, the characters will be talking to each other more than to the camera.
On the middle toolbar, click Location. In the Location pane, check Characters always look at current speaker.

Create dialog
Let’s create a short dialog between the two characters.
For Carl, add the line:
Welcome back. Tonight we have a pioneer in the area of creating animated content, Eve Waterman. Eve, thank you for joining us.
Eve:
Thank you for having me, Carl. It is always a pleasure to talk about what is really my favorite thing to do.
Carl:
Now for those of us who are new to creating video, what advice do you have?
Eve:
Well, basically, have fun. Yes, it helps to know a little bit about how films are made, with actors, cameras and sets; and you’ll find out as you grow with the medium that it really is more like creating a movie than learning to animate.
Carl:
You have written a book about creating movies.
Eve:
Yes, I have. And I wrote it for people who don’t come from a traditional film background.
Carl:
In other words, it’s for anyone with a desire to create.
Note: As always, you can cut and paste these lines into the program.

You know how to create gestures and facial expressions, and we will add those later on. But first, we are going to concentrate only on camera angles to evoke emotion, create tension and pull your audience in.
Now, if you click Play, you’ll hear the basic dialog. Now let’s add some different camera angles to mix things up a little!
Same Subjects, Different Angles
You can create several angles that feature the two characters, from slightly different viewpoints. These angles will add variety and inject energy into the scene. Create at least one additional shot – Camera 18.
Pull Camera 18 to the beginning of the second line of dialog.

Reaction Shot
During a typical dialog, you will often see a reaction shot – a shot that cuts away from the main focus to show a character’s reaction to what is happening or being said. In this scene, one place we could place a reaction shot is during Eve’s second line.
First, let’s create a close-up shot of each character. Use the camera movement buttons to orbit around and get a couple of interesting angles – a reaction shot doesn’t have to be straight on. These will be Cameras 19 for Carl and 20 for Eve.
In Eve’s second line, click right at the beginning of the words …and you’ll find… and drag and drop Camera 19 there.

Closeup Shot
Creating variety in a scene means mixing it up – even with the close-up shots. Let’s pull Camera 19 to the beginning of the third line of dialog. But then drag Camera 20 – Eve’s close-up – to right before the line what advice…. So we’re cutting to Eve, while Carl is still talking - this acts as a reaction shot.

You can think of it like this: we are still watching the action, but instead of watching Carl speaking, we are watching Eve listening to the question.
Over the Shoulder Shot
In the over-the-shoulder shot, your camera is literally looking over one character's shoulder to another character. This shot is commonly used to show a conversation from the first character's perspective. It shows both characters in the same shot and has a sense of intimacy – as if the audience is privy to a secret conversation. Many times, you will see the first character’s shoulder in the foreground while the camera is focused on the second character. But you could also frame it to show the near character’s hand instead of their shoulder – like you may have seen in many a Spaghetti Western. This variation is used to make the foreground character feel larger, more imposing or perhaps threatening.
Let’s make two over the shoulder shots for this scene – one for each character. Use the camera movement buttons on the middle toolbar to position the camera, and then add the angles for Camera 21 (for Carl) and 22 (for Eve).
Note: Positioning over Carl’s shoulder to face Eve in this scene will be difficult – there isn’t a real audience, and we don’t want the background behind Eve to be black. So we can position an angle that will almost be over Carl’s shoulder.
Let’s pull Camera 21 to open Carl’s line: You have written a book about creating movies.
You can put Camera 22 in the middle of Eve’s line: And I wrote it for people who don’t come from a traditional background.

Now when you press Play, you will see a very different scene, one that has energy and is ultimately far more engaging than a static scene.
And if it seems exciting now, wait until you apply all of the other Nawmal features and functionality. Basically, if you can imagine it, you can create it. In this lesson, you learned how to create dialog between two characters, using camera angles to up the energy and emotion.